Tips
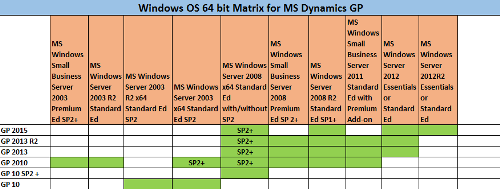
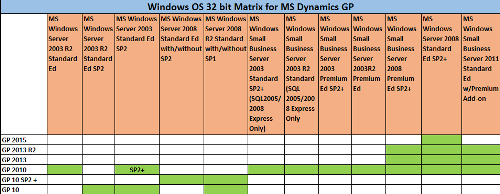
Compatibility matrix for Microsoft Dynamics GP and Server Operating Systems
- Details
Whenever planning for a client’s upgrade or for new implementations, I’m always looking for a quick place to confirm what Microsoft Server operating systems are compatible with the version of Microsoft Dynamics GP I’m planning to install. Well now have a quick reference for just that.
Click images below to enlarge or print
Tips to use Matched Tables in SmartList Builder for Custom Reporting
- Details
Smartlist Builder (SLB) can be a great tool to pull together data to fulfill custom reporting requests. The user friendly interface and ease of use when putting together reports for Dynamics GP data make this a popular end user tool. Read this blog to learn how to use the matched tables feature in Smartlist Builder.
Matched tables can be very useful when you want to pull data into a report and are looking to use a UNION type of command to combine data from multiple tables. A great example of this use in Dynamics GP is the need to pull data from the WORK, OPEN, and HISTORY tables in a single report. The data in these tables is very similar and in SLB can be pulled into a report using the Matched Table feature which will UNION the data together.
To open the Match Tables window in Smartlist Build you want to select your main table and click the edit select table icon. When the Add Table window appears you want to select the Matched Tables button at the bottom of the window.
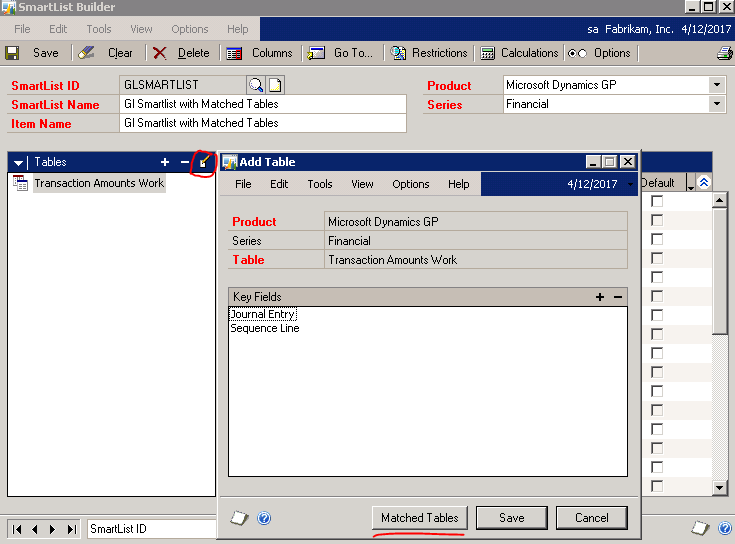
Click to enlarge
Once you have opened the Matched Tables window you want to click the + sign to Add Matched Table. In this window you will want to select the Series and Table you wish to match to your base table. In this case I want to add the OPEN table as a matched table so I would select Financial for the Series and Year-to-Date Transaction Open for the Table and click Save.
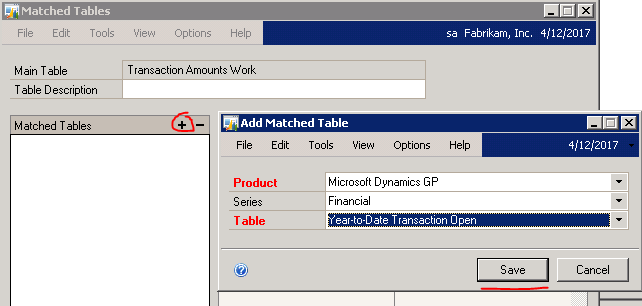
Click to enlarge
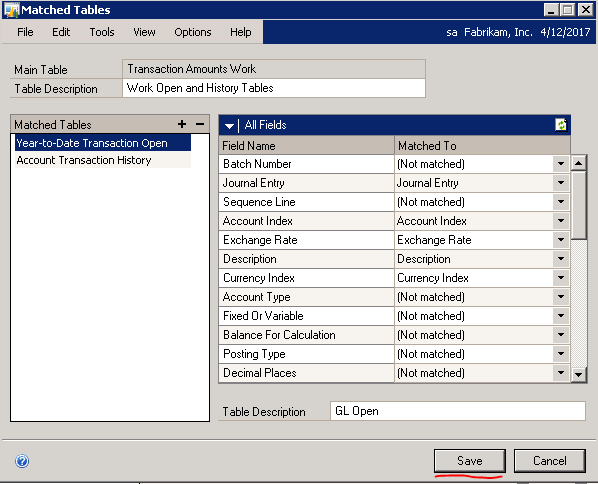
This will bring you back to the Matched Table window where you can now see all the fields from your selected table and what fields they are being matched to in your base table. There will be fields that show as [Not Matched] due to them existing in your base table but not in your Matched Table. These fields can be manually matched if there is a case where the same data field is name differently amongst two tables, but for this example we will just leave the data unmatched.
You must add a Table Description at the top of the window but also have the option of adding a description for each matched table in case you do not like the display name that is shown. You can repeat this process to add the HISTORY table as a matched table to the report. When finished click the Save button to bring you back to the main Smartlist Builder window.
Click to enlarge
In the main window of Smartlist Builder you will now see all the field names of the matched columns from your tables. You can now go through and make further table joins to the data and set your default columns as you would in creating any report in Smartlist Builder.
Good luck with custom reporting in Microsoft Dynamics GP. Email us or call us toll-free at 877.433.0650 if you have any questions about using Smartlist Builder and Matched Tables.
Tips for Microsoft Dynamics GP and Integration Manager Errors
- Details
Do you encounter error messages when using Integration Manager in Microsoft Dynamics GP? Let Business Ready Solutions help you better understand the most common errors that users run into when using Integration Manager, and how to resolve them.
ERROR: Unable to open source queries because Query 'XXX' is not found in the database. – ADO Field is nothing
The ADO field is nothing error is caused when a user still has the data source file open. Whether it is a text file or csv in Excel you want to ensure that the data file is closed before running the integration as this will resolve this error.
The destination could not be initialized due to the following problem: – You must close all Microsoft Dynamics GP windows in order to run an integration.
This error occurs if you have any windows open in Dynamics GP. Closing all GP windows will resolve this error.
ERROR: Null value not allowed for field 'XXX'. Destination Field: XXXX
For the most part any Null Value errors usually point to issues with the source data. This can be missing data such as missing account number or a value in a cell. This also can be cause by blank lines below or above the data. Right clicking the source in your integration and choosing Preview is a good way to check if there are any blank lines in the source data. Deleting any blank rows or filling in blank data points will resolve this error.
ERROR: Integration manager object reference not set to an instance
This particular error can have several causes. The most obvious one is an issue with the source data if you have the data file open you will sometimes see this error occur. If you are able to preview the data by right clicking the source then it may be caused by the next issue. This error can also occur if GP has frozen and had to be reopened. If you open task manager you may find multiple copies of dynamics.exe running. If this is the case you want to exit Dynamics GP and in task manager end all other dynamics.exe processed. When you re-launch GP there should only be one instance of dynamics.exe and this should resolve the error.
Contact us or call us toll free 877-433-0650 if you have any questions about Integration Manager or any module of Microsoft Dynamics GP. We are here to help you leverage the tool to grow your business.
Tips to Generate 1099s in Microsoft Dynamics
- Details
It is that time of the year again. Time to start thinking about generating 1099 forms and getting them processed. Many Dynamics GP users are aware that information produced from the canned 1099 Smartlist report (Purchasing → Vendors → 1099 Vendors*) in GP is not always accurate. This is due to that report being based on the PM00201 Vendor Master Summary table which can be inaccurate due to the timing of closing and transactions occurring near that cutoff.
Use Smartlist Builder:
A quick Smartlist can be created in Smartlist Builder to pull in all of your 1099 information with the period entered. Follow the steps below to generate accurate 1099s by creating this Smartlist.
Open up the tool by navigating to Tools → Smartlist Builder → Smartlist Builder.
Under Smartlist ID give the report an appropriate ID, this will only be seen in Smartlist Builder, in this example I have chosen the ID 1099SL.
Under Product: choose Microsoft Dynamics GP and Series: choose Purchasing.
For Smartlist Name type an appropriate name that will be seen in Smartlist when navigating the lists Note: This will automatically copy to the Item Name: field. In this case I have chosen 1099 Amounts by Period.
Click on images to enlarge...

Now it is time to add in the table we will be using for this report.
In the Tables section click the + sign → Microsoft Dynamics GP Table.
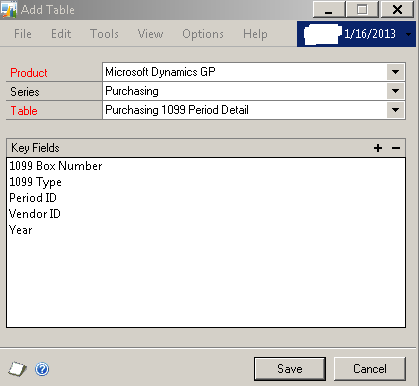
This will bring up the Add Table Box. For Table you want to select: Purchasing 1099 Period Detail.
This will populate several items under Key Fields, at this point you can hit the Save button.
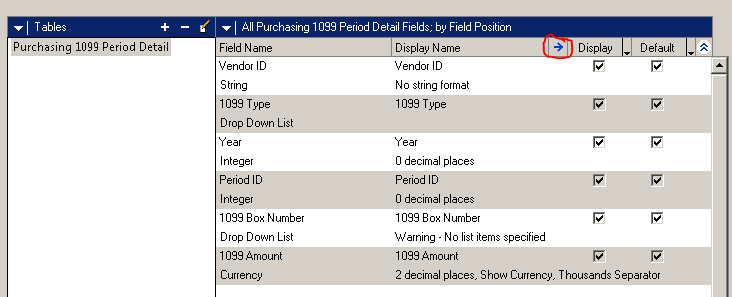
Now you should see all the available columns from this table and each of them should have a checkmark under the display column. Under the default column you can checkmark which fields you would like to show up in this Smartlist by default when you go to run it. For this example I have checked all the fields as default since I would like to see them initially in my report.
At this point you very well could be done, you could save the report and be able to pull it up and run in Smartlist. However there are two more optional steps you could take to improve the report.
Optional Modifications
The first modification I would like to go over is the 1099 Box Number. As you can see in the screenshot above there is a message Warning – No list items specified. This means that the values for all the different 1099 box values aren't contained in this smartlist, so we will need to add them.
To do so, under the Display Name Column highlight 1099 Box Number then click the blue arrow to the right of Display Name circled above.
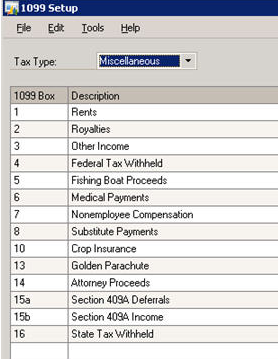
This will bring up the Set Field Options box where you can define what the report will show for the various 1099 box type values. In this box you want to enter the 1099 Box information as shown below.

The second modification is regarding adding a restriction to the report so it does not return any lines that have a 1099 amount of zero.
To do this you want to hit the Restrictions button at the top of the main screen of Smartlist Builder. Then you press the + sign to add a restriction to the list, this will bring up the Add Restriction box.
For field you want to choose 1099 Amount, for Restriction: Is Greater Than, and for Value: 0.00
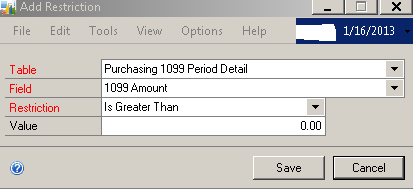
Click the Save button and then Ok and this restriction will be added to the report to ensure that your report only returns information where there is a 1099 amount greater than zero.
Click the Save button and then Ok and this restriction will be added to the report to ensure that your report only returns information where there is a 1099 amount greater than zero.
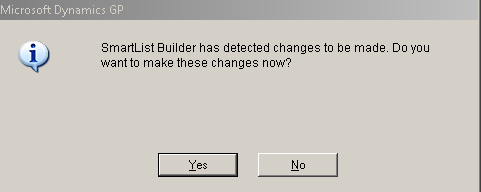
Click yes and a short maintenance will run to add the new information into Smartlist. You should now be able to see your Smartlist under the Purchasing reports. Good luck with processing those 1099s. Please call Business Ready Solutions at 877.433.0650 or Contact Us now for assistance.


